
Brief
How to Build a Battle Belt Setup That Actually Works
Discover how to create an effective battle belt setup for optimal accessibility and comfort. Perfect for any tactical scenario.
A solid battle belt setup carries a holster, two pistol magazines, one rifle magazine (or three pistol mags if you’re running pistol-only), a low-profile IFAK with a tourniquet, and one utility item. That’s the whole first line. Mount everything by clock-face zones, ride the belt high on the iliac crest, and keep total weight within a comfortable range for most users. Anything beyond that belongs on a chest rig or pack.
Here’s the minimal working checklist you can copy right now:
- Holster (strong side, 3:00–4:00 for right-handers)
- 2 pistol magazines (support side, 9:00–10:00)
- 1 rifle magazine pouch (support side, 10:00–11:00) — skip if pistol-only
- IFAK with tourniquet (rear or 6:00, accessible by either hand)
- Dump pouch (support side, collapsible)
- Small flashlight or folding knife (utility slot, rear quarter)
Ride height matters as much as what you carry. The belt should sit on the iliac crest, not the waist. Anything lower and the holster drops into your thigh on a draw; anything higher and it digs into your ribs when you sit. According to the Everyday Marksman, the civilian battle belt works best as a minimalist first-line fighting kit — immediate survival and weapon-management essentials only, with sustainment gear left to a chest rig or pack.
Key Takeaways
A well-built battle belt carries only what you’ll reach for in the first 30 seconds: holster, mags, IFAK, and one utility item, mounted by clock-face zones and tested under real movement before live fire.
| Point | Details |
|---|---|
| Keep the first line minimal | Carry holster, 2–3 mags, IFAK with tourniquet, and one utility item — nothing more on the first line. |
| Holster goes on first | Mount the holster before any other pouch; everything else positions around the draw path. |
| IFAK accessible by either hand | Place the IFAK at 5:00–6:00 so either hand can open it if one arm is compromised. |
| Test with real movement | Sprint, kneel, prone, and vehicle transitions reveal problems that a mirror check never will. |
| Blvista for curated components | Blvista carries duty-grade holsters, pouches, and belt platforms with expert support for one-on-one configuration help. |
Table of Contents
- What belt platform should you choose for a battle belt setup?
- What should you carry on a battle belt?
- Where does everything go? Clock-face placement explained
- How do you attach pouches and holsters securely?
- How should a battle belt fit, and when do you need suspenders?
- How do you test a new battle belt setup before live fire?
- What mistakes do beginners make, and how do instructors fix them?
- How does a battle belt integrate with a plate carrier, and how do you maintain it?
- The minimalist approach is harder than it looks
- Blvista has the gear to build your belt right
- Sources
- FAQ
What belt platform should you choose for a battle belt setup?
The belt you choose determines everything downstream. A soft, floppy belt will torque under load and kill your draw consistency. A stiff, well-fitted platform holds its shape through sprints, kneels, and vehicle exits.
The four main belt types
Two-piece inner/outer systems are the current standard for good reason. The inner rigger belt threads through your pants loops and mates to the outer load-bearing belt via hook-and-loop. Hash Tactical’s setup guide calls this the modern gold standard: the inner belt sizes to your pant waist, the outer belt runs slightly larger, and the whole system stays at a consistent ride height while remaining grab-and-go ready. For civilian and range use, this is the setup to start with.
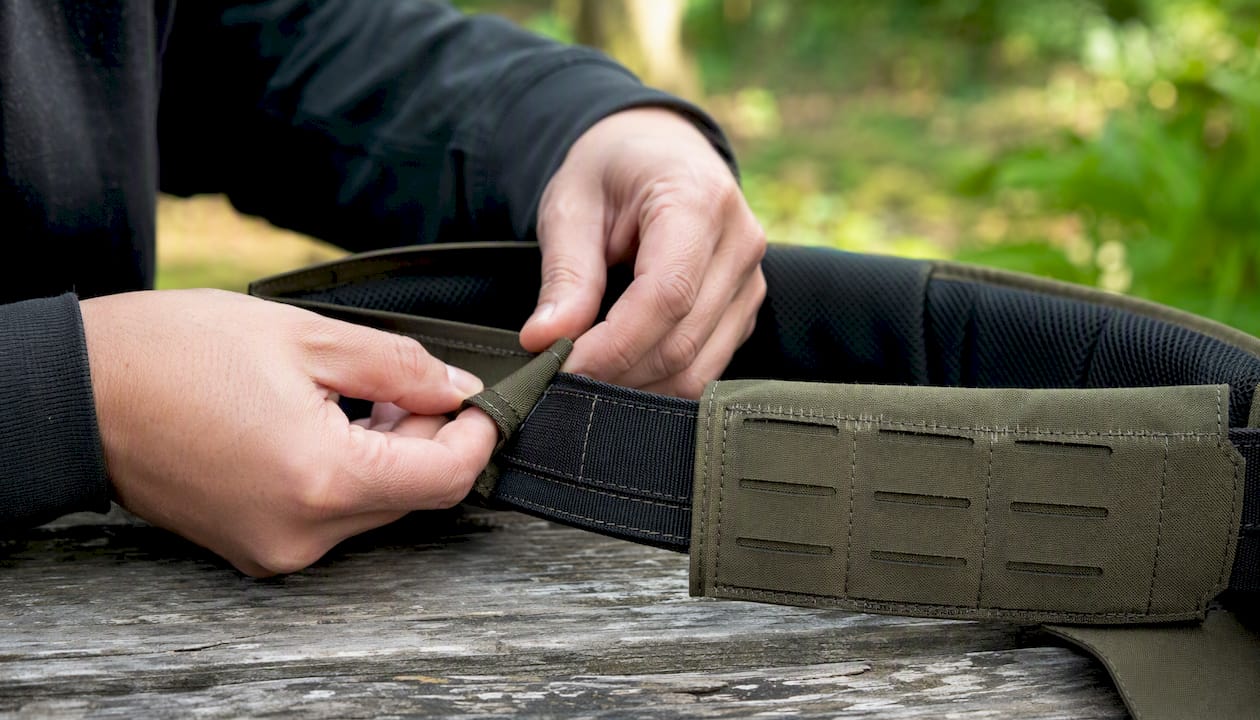
Padded war/battle belts add a foam or molded pad that distributes weight across the hips. They’re comfortable for long wear but can add bulk that interferes with a low-profile draw. Worth considering if you’re training for extended duration.
MOLLE-only belts are flexible and affordable, but they rely entirely on pouch threading for stiffness. Under real load, they rotate and sag. Fine for light range use; not ideal as a primary fighting belt.
Stiffened duty belts (polymer, HDPE, or Tegris stiffeners) hold their shape under heavy loads and give a consistent draw platform. The Everyday Marksman notes that a stiff duty belt with a pad often outperforms older padded MOLLE-only designs for consistent holster draws.
Sizing rules
Measure over the clothing you’ll actually wear — not your bare waist. A belt sized for jeans will be too tight over a winter base layer. Width of 1.75"–2" is the most common and compatible range for standard MOLLE pouches and holster mounts. Go narrower and you lose pouch options; go wider and you start fighting pants-loop clearance.
| Belt Type | Best For | Stiffness | Comfort | MOLLE Compatibility |
|---|---|---|---|---|
| Two-piece inner/outer | Civilian, range, tactical | High | High | Full |
| Padded war belt | Extended wear, training | Medium | Very High | Full |
| MOLLE-only | Light range use | Low | Medium | Full |
| Stiffened duty belt | Duty, vehicle, heavy loads | Very High | Medium | Partial |
Pro Tip: Before buying, thread a MOLLE pouch onto the belt in the store or check the manufacturer’s MOLLE row count. A belt with only two MOLLE rows limits your pouch options significantly — three rows gives you real flexibility.
When suspenders make sense: if your loaded belt exceeds roughly 12 lbs, suspenders start to look attractive. But adding them changes the rig’s role from a quick-on fighting belt to load-bearing equipment. If you’re reaching for suspenders at typical working loads, the better fix is usually moving items off the first line entirely.
What should you carry on a battle belt?
The short answer: less than you think. UF PRO’s battle belt guide frames the first line as immediate survival and fighting essentials only — not sustainment, not comfort items, not “just-in-case” gear. Instructors consistently report that overcrowding is the most common beginner mistake, adding items that increase bulk and impede movement without improving capability.
Core essentials
Holster: Fit and retention are non-negotiable. The holster must be purpose-built for your specific pistol model, not a universal fit. Level II retention minimum for any dynamic use.
Magazines: Two pistol mags plus one rifle mag is a practical baseline for a two-gun setup. Running pistol-only? Three pistol mags covers most range and defensive scenarios. Keep them on the support side for a natural cross-draw reload.
IFAK with tourniquet: The tourniquet goes on the outside of the IFAK, accessible without opening the pouch. Placement near the rear (6:00) allows access by either hand — critical if one arm is compromised. The IFAK itself should be low-profile; a bulky med kit at the rear creates a pressure point when sitting.
Dump pouch: Collapsible. It lives flat until you need it, then opens for spent magazines during a reload. Mount it on the support side, forward of the IFAK.
High-value optional items
- Small flashlight (1"–1.5" diameter, belt-mounted clip or pouch)
- Folding knife or multi-tool (accessible by strong hand)
- Radio pouch (rear quarter, if comms are part of your kit)
- Additional pistol mag (support side, if no rifle)
The discipline shapes the loadout. For USPSA or 2-gun competition, Athlon Outdoors recommends positioning items near the forward hip bones and building muscle memory through consistent placement across every training session. For vehicle-centric use, move the IFAK forward slightly so it clears the seat back. For duty use, add a radio and cuff pouch and reconsider the dump pouch entirely.
Pro Tip: Run your belt empty for the first session. Dry-fit pouches with nothing in them, then do 10 draws and 10 reloads. You’ll find interference problems in five minutes that would take three range sessions to diagnose with a loaded belt.
Where does everything go? Clock-face placement explained
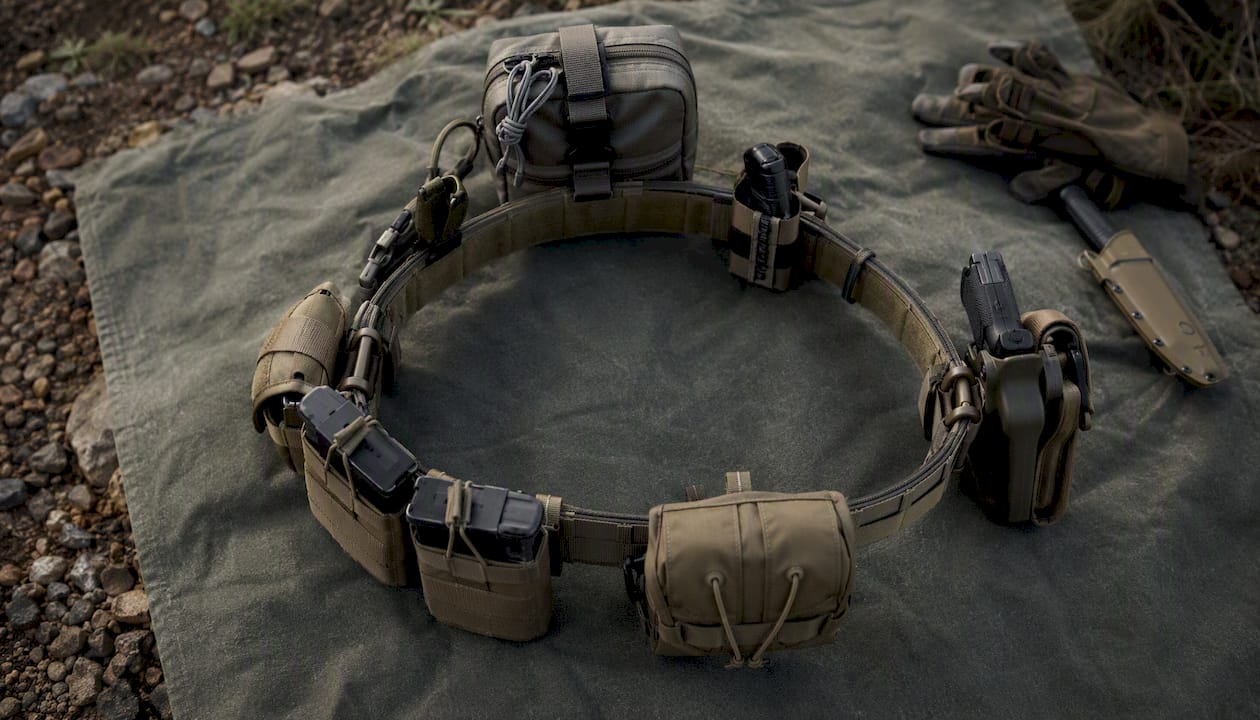
The clock-face method maps your belt like a clock dial, with the buckle at 12:00. It gives you a repeatable, communicable system for placing gear and rebuilding the same layout across different rigs. Primary Arms’ battle belt guide recommends this method specifically for building consistent muscle memory.
Recommended positions by item
| Item | Right-Hander | Left-Hander | Notes |
|---|---|---|---|
| Holster | 3:00–4:00 | 8:00–9:00 | Strong side, forward cant preferred |
| Pistol mags | 10:00–11:00 | 1:00–2:00 | Support side, bullets forward |
| Rifle mag | 11:00 | 1:00 | Support side, adjacent to pistol mags |
| IFAK | 5:00–6:00 | 6:00 | Rear, accessible by either hand |
| Dump pouch | 9:00–10:00 | 2:00–3:00 | Support side, collapsible |
| Flashlight | 7:00 | 4:00–5:00 | Rear quarter, strong side |
| Knife/multi-tool | 4:00–5:00 | 7:00 | Strong side, rear of holster |
| Radio | 1:00–2:00 | 10:00–11:00 | Support side front, if carried |
Mounting order matters
Mount the holster first. Everything else positions around it. Holster first, then pistol mags on the support side, then rifle mag adjacent to pistol mags, then IFAK and dump pouch, then utility items last. This order prevents the most common interference problem: a mag pouch that blocks the holster draw path.
Ergonomic checks by position: Anything at 6:00 will dig into a car seat — test vehicle entry before finalizing rear placement. Items at 3:00 or 9:00 can catch on door frames. Prone position exposes anything at 12:00 to ground pressure, so keep the buckle area clear. Kneeling shifts the belt slightly; check that the holster doesn’t torque inward.
Pro Tip: Use painter’s tape to mark MOLLE columns during initial setup. Number them left to right. When you rebuild the belt after cleaning or switching rigs, you can return every pouch to the exact column without guessing.
How do you attach pouches and holsters securely?
Threading a pouch through MOLLE and calling it done is how gear ends up on the ground at the worst moment. Attachment method selection is worth five minutes of thought before you mount anything.
The main attachment options
1" Velcro One-Wrap is the most practical retention solution for MOLLE pouches. It threads through the MOLLE webbing, wraps around the pouch’s attachment straps, and forms a secure loop. It’s easily trimmed to length, survives repeated use, and adds almost no weight. The Everyday Marksman specifically recommends it for rock-solid retention on MOLLE-mounted gear.
MALICE clips (and their equivalents) are rigid polymer clips that lock a pouch to MOLLE webbing mechanically. They’re more permanent than One-Wrap and resist rotation well. The trade-off: repositioning takes a tool and real effort, so they’re best for items you’ve already finalized in position.
Tek-Lok and similar belt-clip systems mount directly to the belt without MOLLE threading. Common for holsters and knife sheaths. Fast to swap, but the clip must match your belt width exactly or it will rock under load.
Direct MOLLE threading (weaving the pouch’s straps through alternating rows) works for light pouches. For anything carrying weight — a loaded IFAK, a full mag pouch — thread through and add One-Wrap or a MALICE clip as a secondary lock.
Self-adhesive hook-and-loop on hard plastics: Range Hot’s setup guide recommends adding self-adhesive hook-and-loop tape to the backs of hard-plastic accessories when MOLLE threading alone isn’t enough. Press the hook side onto the plastic back, mate it to the loop surface of the belt, and the pouch stops rotating entirely.
Common failure modes to prevent
- Rotation: Usually means the pouch is only threaded through one MOLLE row. Use two rows minimum, plus One-Wrap.
- Slipping down: The belt itself is too soft or the pouch straps are too loose. Tighten the straps fully before adding secondary retention.
- Tear-out: Worn MOLLE stitching or cheap pouch webbing. Inspect stitching at every cleaning.
- Clip pop-off: Tek-Lok or MALICE clip not fully seated. Press until you hear/feel the click, then tug hard before trusting it.
Pro Tip: After mounting any new pouch, grab it with both hands and twist hard in both directions. If it moves more than a few millimeters, it will move more under a sprint. Fix it before it becomes a field problem.
How should a battle belt fit, and when do you need suspenders?
Fit is where most belts fail before a single round is fired. The belt rides on the iliac crest, the bony shelf of your hip. Too low and the holster drops; too high and the belt digs into your lower ribs when you sit or crouch.
Sizing both belts correctly
The inner belt sizes to your pant waist measurement, taken over the pants you’ll wear. The outer belt runs one size larger to mate cleanly without bunching. When both are mated, you should be able to slide two fingers under the outer belt at the rear — snug but not compressing.
Padding and pressure points
A padded war belt or a separate hip pad reduces pressure during long wear. The IFAK placement at the rear (6:00) is the most common pressure point when sitting; if it digs into your lower back in a vehicle, shift it 30–45 degrees to one side. Kidney pads on some belt systems protect the lumbar area during extended standing or movement.
Load limits and the suspender question
A working load of 8–12 lbs is the practical range for a battle belt before comfort and mobility start to suffer. Hash Tactical notes that if a belt requires suspenders at typical working loads, the better solution is reconsidering what belongs on the first line — suspenders convert the belt into load-bearing equipment and change its role entirely. If you’re moving items to a tactical backpack or range bag to stay under that threshold, that’s the right call.
Quick fit checks
- Finger-gap rule: Two fingers fit under the rear of the outer belt when mated.
- Jumping test: Do 10 jumping jacks. The belt should not shift more than half an inch.
- Rotational check: Grab the belt at 3:00 and 9:00 and try to rotate it. It should resist firmly.
For tactical athletes carrying heavier loads, injury prevention habits for load carriage are worth reviewing before committing to a heavy first-line configuration.
How do you test a new battle belt setup before live fire?
Testing in real movement — not mirror arrangement — is the single highest-return practice for finding problems before they matter. UF PRO’s guidance frames the shake test and movement stress tests as the standard for finalizing any layout.
The dry-test sequence
- Mount the belt empty. Mate inner and outer belts fully.
- Attach the holster first. Check draw clearance with an empty pistol.
- Mount mag pouches. Run 10 dry reloads — strong hand to support side and back.
- Add IFAK and dump pouch. Confirm IFAK opens without repositioning the belt.
- Load magazines and IFAK contents. Run the shake test: jump, sprint 10 yards, drop to a knee.
- Check that nothing has shifted, rotated, or opened.
Motion drills
- Sprint 20 yards and stop hard. Check all pouch positions.
- Run a short lane with two kneeling transitions and one prone. Check holster retention.
- Get in and out of a vehicle three times. Note any items that dig or catch.
- Perform 10 draws and 10 reloads under a 3-second par time. Note any fumbles.
Pro Tip: Record your first dry-run on your phone. Watching the footage reveals belt movement and draw path issues you won’t notice in real time.
Post-change verification checklist
- Nothing shifts during the shake test
- Draw clears the holster without snagging clothing or adjacent pouches
- Reload reaches the mag pouch without looking
- IFAK opens with one hand from either side
- No item digs into the body during sitting or kneeling
The three-session rule: Don’t finalize holster height, mag angle, or med kit placement after one session. Run three sessions with the same layout before moving anything. Small discomforts often resolve as you adapt; real problems get worse.
What mistakes do beginners make, and how do instructors fix them?
Overcrowding is the defining beginner error. A belt loaded with eight pouches looks capable; it performs like a Christmas tree. Instructors consistently point to the same cluster of mistakes.
The most common errors
- Mounting mags before the holster: The holster draw path gets blocked. Always holster first.
- Skipping the shake test: Pouches that look solid in a mirror rotate on the first sprint.
- Inconsistent placement across rigs: Muscle memory built on one belt fails on another if positions shift even one MOLLE column.
- Rear-heavy loading: Too much weight at 6:00 pulls the belt down at the back and lifts the holster at the front.
- Ignoring vehicle use: A setup that works standing may be completely inaccessible in a seated position.
Instructor-level fixes
Keep three primary positions clean: sidearm, mags, and medical. Everything else is secondary. If an item isn’t accessed in the first 30 seconds of a scenario, it probably belongs on a chest rig or plate carrier, not the first line.
Use consistent indexing. Every time you rebuild the belt, every pouch goes back to the same MOLLE column. Painter’s tape numbering (from the deep knowledge on assembly) makes this fast and repeatable.
Pro Tip: If you can’t find a pouch by feel alone after 20 repetitions, it’s in the wrong place. Placement should be indexable without looking — that’s the whole point of building muscle memory.
For carbine users, carbine training principles apply directly to rifle mag placement and reload drills — the belt position and the training method have to match.
Attachment hacks worth adopting: One-Wrap for MOLLE retention, self-adhesive hook-and-loop on hard-plastic pouch backs, and numbered painter’s tape columns for repeatable positioning.
How does a battle belt integrate with a plate carrier, and how do you maintain it?
Integration rules
When you add a plate carrier, the belt’s role narrows. Chase Tactical’s tactical belt guide recommends keeping belt pouches below or clear of the carrier’s cummerbund to prevent interference. Don’t duplicate magazine placement — if the carrier has mag pouches, the belt doesn’t need them too. Move non-critical items to the carrier or pack.
Ride height shifts slightly when wearing armor. The carrier’s cummerbund can push the outer belt down; remeasure and re-mate after adding the carrier. Check holster draw clearance with the full kit on, not just the belt alone.
Seasonal and clothing-layer adjustments
Winter layers add 1"–2" to your effective waist measurement. Remeasure the inner belt over your actual cold-weather base layer before the season changes. A belt sized for a t-shirt will be dangerously tight over a fleece and jacket.
Maintenance checklist
- Velcro: Pick lint and debris from hook-and-loop surfaces after every range session. Clogged Velcro loses 40–60% of its holding strength.
- Clips: Inspect MALICE clips and Tek-Lok clips for cracks at every cleaning. Polymer fatigues under UV and repeated flex.
- Stitching: Check pouch attachment stitching monthly. Any fraying at MOLLE attachment points means the pouch is due for replacement.
- Stiffener: A polymer or HDPE stiffener that has developed a permanent curve or creak under load should be replaced. A warped stiffener kills draw consistency.
- Holster retention: Test retention adjustment quarterly. Retention screws back out over time; a holster that passed the shake test six months ago may not pass today.
The minimalist approach is harder than it looks
Most people who build a battle belt for the first time add too much. The instinct makes sense: you’re building a kit, so you want the kit to be complete. But a belt loaded with eight pouches doesn’t make you more prepared — it makes you slower, heavier, and less consistent on the draw.
The practical approach is to start with the absolute minimum: holster, two mags, IFAK with tourniquet. Train with that for a month. Then ask what you actually reached for and what you never touched. Add only what the training revealed you needed, not what you imagined you might need.
The other thing worth saying plainly: a battle belt for civilian range use and a battle belt for a short-duration tactical scenario are not the same thing. The civilian range setup can afford to be lighter and more comfortable. The tactical setup prioritizes survivability over comfort. Knowing which one you’re building shapes every decision from belt type to pouch count.
Blvista has the gear to build your belt right
Building a reliable belt starts with sourcing components you can trust. Blvista carries duty-grade holsters, IFAK pouches, MOLLE-compatible mag pouches, and belt platforms from established brands — the same gear that shows up in the setups described throughout this guide.
If you want a curated path rather than sourcing piece by piece, Blvista’s expert support team can walk you through a configuration matched to your use case, whether that’s a range-ready pistol belt or a full two-gun setup. For readers building out a complete kit, the Blvista shop carries tactical accessories alongside ammunition like Accurate No. 2 Handgun Powder for those who reload their own pistol rounds.
Contact Blvista’s specialist team directly for one-on-one configuration help, or browse the tactical accessories section to start building your kit today.
Sources
The following sources shaped this guide and are worth reading in full for deeper dives on specific techniques:
- The Everyday Marksman’s Guide to Setting Up a Battle Belt
- Optimizing your shooting belt
- How to setup a range belt or battle belt
- Battle Belt Setup Guide: From Loadout Logic to Field Efficiency
- Setting Up Your Battle Belt for Peak Efficiency | Hash Tactical Guide
Recommended
FAQ
Start with a holster, two pistol magazines, an IFAK with a tourniquet, and a collapsible dump pouch. That’s four to five items — enough for most range and defensive scenarios without overcrowding the belt.
A duty belt is a single stiff belt worn through pants loops, typically for law enforcement carry. A battle belt is a two-piece system with an inner rigger belt and an outer load-bearing platform that mounts MOLLE pouches and holsters for tactical or range use.
If the belt shifts more than half an inch during jumping jacks or requires suspenders to stay comfortable at your normal working load, it’s too heavy. The practical ceiling is roughly 8–12 lbs before mobility and comfort suffer.
Place the IFAK at 5:00–6:00 (rear center), accessible by either hand. The tourniquet should be mounted on the outside of the IFAK pouch so it can be grabbed without opening the kit.
Clean Velcro surfaces and inspect clip integrity after every range session. Check pouch stitching and holster retention monthly. Replace any component showing cracked clips, frayed stitching, or a warped stiffener.
Was this useful?